DRV8833 motor driver module

Recently I have bought some DRV8833 modules on Aliexpress. Unfortunately, I could not find the schematic of this module. Therefore I have made it myself to share it on my site.

The module is marked with MJKDZ and looks similar like this module.

With the following specifications:

And has the following schematic:

Posted in Module, Motor control | 6 Comments

Reprogramming a HC-11 CC1101 433MHz Wireless Transceiver Module

The HC-11 and HC-12 are low cost 433MHz Wireless Transceiver Modules. It would be fun if opensource firmware could be developed for the on-board STM8S003F3P6 microcontroller. A free IDE for STM8 can be downloaded at Cosmic http://cosmic-software.com/download.php or look at STVD-STM8 from ST.

After investigating the HC-11 pcb two test pads are identified. One connects to the SWIM port, the other to RESET. This is a HC11 HCMODU0054.

Luckily al digital CC1101 pins are connected to the STM8. See the connection matrix for details.

Connection matrix :

HC-11 connections

HC-11 HCMODU0054


Posted in Uncategorized | 1 Comment

HB24208 HB24209 VLGEM1021-03 VLGEM1021A-02 LCD Datasheet

HB24208 HB24209 VLGEM1021-03 VLGEM1021A-02 LCD Datasheet

KS0073 34COM 60SEG DRIVER & CONTROLLER FOR DOT MATRIX LCD

C-Library for VLGEM1021-03 type LCD

Posted in Uncategorized | Leave a comment

PS2 thumbstick/joystick “Subminiature Joystick – Model 802” datasheet

Hard to find datasheet: Subminiature Joystick – Model 802 PS2 thumbstick

Posted in Uncategorized | Leave a comment

Simple short range IR communication for toys

I have a couple of electric Lego Duplo trains which I want to make more intelligent. Like remote control, collision/stall detection and the ability to work together to pull more load. For the inter locomotive communication I’ll use IR transceivers at the front and back. To keep it simple the IR beam is not modulated and is connected to an UART. (one UART for the front and one for the back of the locomotive). I have tested a receiver circuit using a photodiode and a phototransistor.  The phototransistor circuit is the most simple and worked well with a range over 30 CM which is enough. a baudrate of  1200 work best, with 2400 and 4800 baud the range was decreased. Short range IR transceiver

This circuit can also be used with an Arduino. The IR LED and IR phototransistor pairs are sold on ebay.


Posted in Uncategorized | Leave a comment

Modifying the FGD280E3725 or FGD280E3715V1 2.8 Inch TFT display bus width

A while ago I purchased some FGD280E3725 TFT LCD Touch displays at eCyberspaces, see 2.8 inch 37P TFT LCD Screen ST7781R TP I received the connector pinout but did not know if the display had a 16 or 8-bit databus width. The ST7781R uses Interface Mode Select bits to set the interface type. Since the display has either an 8-bit or 16-bit interface I assume that pin IM0 is wired to the FPC. The display has an FPC type FPC2803725 0r FPC2803715 depending on the display. This FPC contains two resistors R1 and R2. Only one Resistor is populated. R1 is connected to VCCI and R2 to Ground. So currently my device is set to a 16-bit bus width since R2 is populated so IM0=0. I’ll remove R2 and place R1 and then I assume the Interface Width is set to 8-bit. I’ll test this when my test PCB arrives.

Datascheet: FGD280E3715V1

FPC2803715 IM0FDG280E3725 Pinout2.8 inch


Posted in Uncategorized | 2 Comments

PICkit3 PICkit3.5 wiring diagram

PICkit3 PICkit3.5 connection diagram

Posted in Uncategorized | Leave a comment

a simple toy audio player

Preface

The goal was to make a simple low cost audio player like can be found in Chinese toys. The second goal was to learn about ARM microcontrollers, the system is built around a ST STM32F030F4.

The system contains the following parts:

  • A simple File System
  • SPI Flash storage
  • A terminal program to write WAV files to the File System
  • A 8KHz mono WAV player with up sampler to 32KHz
  • 32KHz 8-bit PWM to drive the speaker
  • A state machine to control which file to play
  • A trick to save the previous state during Standby mode

High Level schematic

The hardware/software design can be found at github: https://github.com/MvdLande/Toy-Audio

Currently I have build Hardware V1 Rev A. The player uses a 32KHz PWM signal to directly drive the speaker using a N-MOSFET. I’m using a 32KHz signal to play a 8KHz WAV file, the speaker and the human ear will filter out the undesired frequencies. a DC signal of Vcc/2 is always applied to this speaker. It works, but I’m going for V2 which has a low pass filter to filter the PWM signal and an audio amplifier. Using Hardware V1 I have replaced the 8 Ohm speakers with 16Ohm because the can become hot while playing a long song. Version V1 started as a proof of concept. The code is a little messy. I might clean it up later on. The current software support 2 WAV files, which can be loaded using a Terminal program with Y-modem (like Tera Term)

Hardware:

20160207_233113 20160207_233131


Schematic: Hardware V1 Rev : A


Posted in Uncategorized | Leave a comment

STM32F030F4P6 USART1 init with STM32 Standard Peripheral Libraries

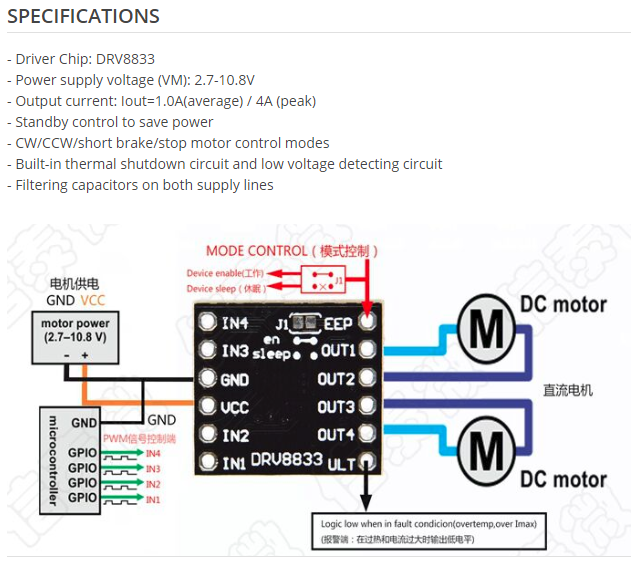
I could not find USART1 example code using the STM32 Standard Peripheral Libraries  for a STM32F0 device. Therefore I’ll post mine…

  usart.c

#include "usart.h"


/**
**===========================================================================
**
**  Abstract: Initialize USART1
**
**===========================================================================
*/
void InitUSART1(void)
{

	// USART peripheral initialization settings    
	USART_InitTypeDef USART_InitStructure;
	GPIO_InitTypeDef GPIO_InitStructure;
	USART_ClockInitTypeDef USART_ClockInitStructure;

	RCC_AHBPeriphClockCmd(RCC_AHBPeriph_GPIOA, ENABLE);
	RCC_APB2PeriphClockCmd(RCC_APB2Periph_USART1, ENABLE);
	
	//Configure USART1 pins: Rx (PA2), Tx(PA3)
	GPIO_InitStructure.GPIO_Pin = GPIO_Pin_2 | GPIO_Pin_3;
	GPIO_InitStructure.GPIO_Speed = GPIO_Speed_50MHz;
	GPIO_InitStructure.GPIO_Mode = GPIO_Mode_AF;
	GPIO_InitStructure.GPIO_OType = GPIO_OType_PP;
	GPIO_InitStructure.GPIO_PuPd = GPIO_PuPd_UP;
	GPIO_Init(GPIOA, &GPIO_InitStructure);

	// configure GPIO pins with GPIO_Mode_AF before setting the AF config!
	GPIO_PinAFConfig(GPIOA, GPIO_PinSource2, GPIO_AF_1);
	GPIO_PinAFConfig(GPIOA, GPIO_PinSource3, GPIO_AF_1);
	
	//Configure USART1 setting: ----------------------------
	USART_StructInit(&USART_InitStructure);			// default 8bit, 9600 baud, stopbit=1, parity=none, full duplex, no hardware flowcontrol
	USART_InitStructure.USART_BaudRate = 115200;	// set baudrate to 115k2
	
	USART_OverSampling8Cmd(USART1, ENABLE); // standard oversampling = 16

	USART_Init(USART1, &USART_InitStructure); // USART is disabled after calling the USART_Init function
	
	USART_Cmd(USART1, ENABLE);
	
	Serial_PutString(USART1, "USART1 Init done...\r\n");
}
/**
**===========================================================================
**
**  Abstract: Get_Byte (blocking mode)
**
**===========================================================================
*/

uint8_t Serial_GetByte(USART_TypeDef *USARTx)
{
	while (USART_GetFlagStatus(USARTx, USART_FLAG_RXNE) == RESET)
		;
	return USART_ReceiveData(USARTx);
}
/**
**===========================================================================
**
**  Abstract: Send_Byte (blocking mode)
**
**===========================================================================
*/
void Serial_PutByte(USART_TypeDef *USARTx, uint8_t byte)
{
	while (USART_GetFlagStatus(USARTx, USART_FLAG_TXE) == RESET)
		;
	USART_SendData(USARTx, byte);
}
/**
**===========================================================================
**
**  Abstract: SendPacket
**
**===========================================================================
*/
void Serial_SendPacket(USART_TypeDef *USARTx, uint8_t *data, uint16_t length)
{
	uint16_t i;
	i = 0;
	while (i < length)
	{
		Serial_PutByte(USARTx, data[i]);
		i++;
	}
}
/**
**===========================================================================
**
**  Abstract: SendString
**
**===========================================================================
*/
void Serial_PutString(USART_TypeDef *USARTx, char *p_string)
{
	uint16_t length = 0;

	while (p_string[length] != '\0')
	{
		Serial_PutByte(USARTx, p_string[length]);
		length++;
	}
}

  usart.h

#pragma once
#include 
#include 
#include 
#include 

void InitUSART1(void);
void Serial_PutByte(USART_TypeDef *USARTx, uint8_t byte);
uint8_t Serial_GetByte(USART_TypeDef *USARTx);
void Serial_SendPacket(USART_TypeDef *USARTx, uint8_t *data, uint16_t length);
void Serial_PutString(USART_TypeDef *USARTx, char *p_string);
Posted in ARM, STM32 | Leave a comment

Prolific PL2303HX USB serial

I while ago I bought a couple of Prolific USB to Serial adapters not knowing that Prolific has ended support for “previous generation” chips on Windows 8 and up. Luckily a driver has been compiled to support all prolific IC’s
4-wire PL2303HX USB serial

Black cable—–GND
Green cable—-TXD
White cable—-RXD
Red cable —–5V

driver: Prolific USB To Serial Driver Fix!


Posted in Uncategorized | Leave a comment